Vite 是一个基于开发服务器的构建工具,它在启动应用程序之前组装 JavaScript 代码,同时Vite还有助于在进行更改时减少加载速度,并允许您几乎可以立即查看结果。
在这篇文章中,我们将解决前端 Web 开发人员的需求,并向您展示如何使用 Vite 库来显着提高 Javascript 客户端应用程序的启动/更新速度。
Vite将代码创建为ES模块——现代浏览器可以用来加载JavaScript的模块,在依赖较大的情况下,Vite 会预先捆绑这些模块,以减少浏览器对 Web 服务器的请求数量。在以下部分中,我们将向您展示如何将Vite添加到由
添加DevExpress Document Viewer和Report Designer组件
添加Document Viewer的步骤
将 src/pages/document-viewer/document-viewer.tsx 文件内容替换为以下内容:
import React from 'react';import ko from 'knockout';import 'devexpress-reporting/dx-webdocumentviewer';import './document-viewer.scss';class ReportViewer extends React.Component {constructor(props) {super(props);this.viewerRef = React.createRef();this.reportUrl = ko.observable("Invoice");this.requestOptions = {host: "https://localhost:5001/",invokeAction: "DXXRDV"};}render() {return (<div ref={this.viewerRef} data-bind="dxReportViewer: $data"></div>);}componentDidMount() {ko.applyBindings({reportUrl: this.reportUrl,requestOptions: this.requestOptions}, this.viewerRef.current);}componentWillUnmount() {ko.cleanNode(this.viewerRef.current);}};export default () => (<React.Fragment><h2 className={'content-block'}>Document Viewer</h2><div className={'content-block'}><div className={'dx-card responsive-paddings'}><div style={{ width: "100%", height: "700px" }}><ReportViewer /></div></div></div></React.Fragment>);
以下属性指定 表名称:
this.reportUrl = ko.observable(“Invoice”);
主机指定服务器端应用地址:
host: https://localhost:5001/
最后在 src/pages/document-viewer/document-viewer.scss 页面添加如下内容:
@import url("../../../node_modules/jquery-ui/themes/base/all.css");@import url("../../../node_modules/devextreme/dist/css/dx.material.orange.light.css");@import url("../../../node_modules/@devexpress/analytics-core/dist/css/dx-analytics.common.css");@import url("../../../node_modules/@devexpress/analytics-core/dist/css/dx-analytics.material.orange.light.css");@import url("../../../node_modules/devexpress-reporting/dist/css/dx-webdocumentviewer.css");
添加DevExpress Report Designer的步骤
将 src/pages/report-designer/report-designer.tsx 文件内容替换为以下内容:
import React from 'react';import ko from 'knockout';import 'devexpress-reporting/dx-reportdesigner';import './report-designer.scss';class ReportDesigner extends React.Component {constructor(props) {super(props);this.designerRef = React.createRef();this.reportUrl = ko.observable("Invoice");this.requestOptions = {host: "https://localhost:5001/",getDesignerModelAction: "/DXXRD/GetDesignerModel"};}render() {return (<div ref={this.designerRef} data-bind="dxReportDesigner: $data"></div>);}componentDidMount() {ko.applyBindings({reportUrl: this.reportUrl,requestOptions: this.requestOptions}, this.designerRef.current);}componentWillUnmount() {ko.cleanNode(this.designerRef.current);}};export default () => (<React.Fragment><h2 className={'content-block'}>Report Designer</h2><div className={'content-block'}><div className={'dx-card responsive-paddings'}><div style={{ width: "100%", height: "700px" }}><ReportDesigner /></div></div></div></React.Fragment>);
以下属性指定 表名称:
this.reportUrl = ko.observable("Invoice");
主机指定服务器端应用地址:
host: https://localhost:5001/
因此,将以下内容添加到 src/pages/report-designer/report-designer.scss 页面以完成此步骤:
@import url("../../../node_modules/jquery-ui/themes/base/all.css");@import url("../../../node_modules/devextreme/dist/css/dx.material.orange.light.css");@import url("../../../node_modules/@devexpress/analytics-core/dist/css/dx-analytics.common.css");@import url("../../../node_modules/@devexpress/analytics-core/dist/css/dx-analytics.material.orange.light.css");@import url("../../../node_modules/@devexpress/analytics-core/dist/css/dx-querybuilder.css");@import url("../../../node_modules/devexpress-reporting/dist/css/dx-webdocumentviewer.css");@import url("../../../node_modules/devexpress-reporting/dist/css/dx-reportdesigner.css");
运行 表后端应用程序
Web 表组件需要一个后端应用程序来存储和处理 告,运行后端应用程序以确定地址,并将该地址分别指定为 src/pages/document-viewer/document-viewer.tsx和src/pages/report-designer/report-designer中 ReportViewer和ReportDesigner组件的主机选项.tsx文件。
如果您刚刚创建了一个后端应用程序,可以从模板中创建一个TestReport,除了这个简单的 告,您还可以加载我们的发行版附带的 表。要加载 表,请在官方的WinForms Reporting演示中打开 Invoice 模块,切换到 Designer,然后将 表另存为REPX文件。在Visual Studio Report Designer中打开TestReport 表,然后单击 表智能标记中的打开/导入以加载您保存的REPX文件。
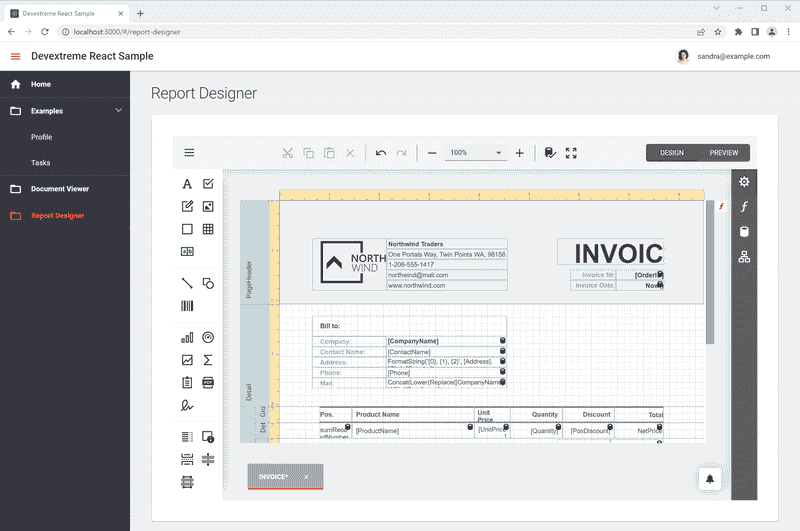
运行客户端应用程序
确保后端应用程序正在运行,导航到devextreme-react-sample文件夹,然后执行以下命令:
npm install
npm run start
完成后,应用程序应如下所示:

DevExpress技术交流群6:600715373 欢迎一起进群讨论

标签:
声明:本站部分文章及图片源自用户投稿,如本站任何资料有侵权请您尽早请联系jinwei@zod.com.cn进行处理,非常感谢!