在一些应用场景中,我们可能需要记录某一天,某个时段的日程安排,那么这个时候就需要引入了
日程控件XtraScheduler的数据绑定
在日程控件里面,我们最重要,最关注的莫过于它的数据绑定及内容显示了,因为只有这样,我们才可以用于实价的应用当中,为用户显示他所需的数据,并存储我们所需要的数据。
在日程控件里面,有相应的引导我们进行这样的处理,还是非常不错的。
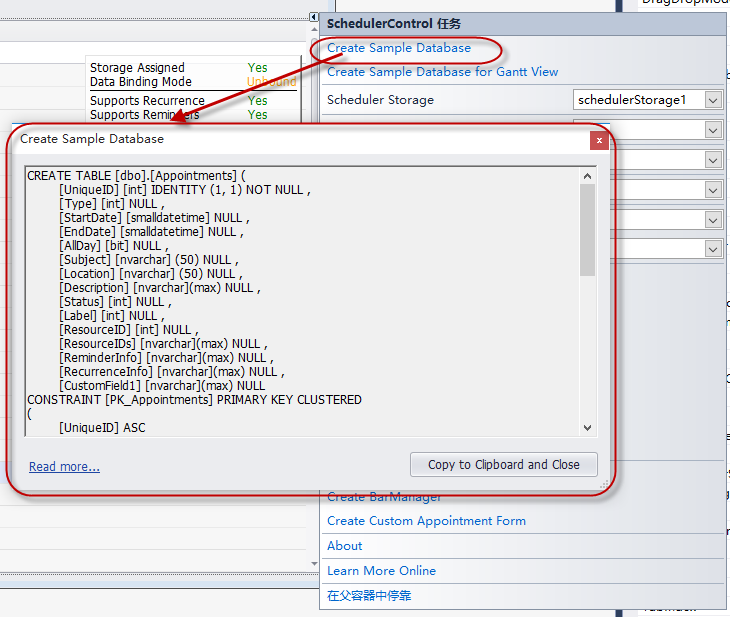
数据的绑定,我们需要了解日程控件的默认处理方式,因为它也提供了一些数据字段的信息,我们从控件的对象里面,看到有创建数据库的信息,里面有一些表的字段,我们可以参考来创建我们的数据存储信息,其中就包括了资源Resource的存储,日程事件安排Appointments的存储,如下所示。

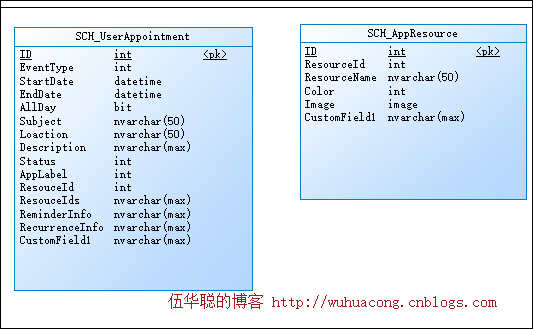
根据这个里面的字段信息,我们可以建立自己的数据库模型如下所示。
在数据库里面创建这两个表,并根据这些表对象,使用代码生成工具Database2Sharp进行代码的快速生成,然后复制生成的代码到具体的测试项目里面,生成的代码无需任何修改即可直接使用在具体项目里面,测试项目如下代码结构所示。
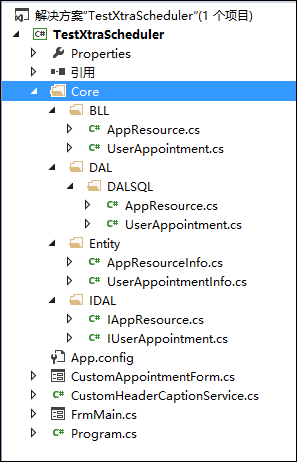
如日程资源对象的数据库信息,就会转换为具体的实体类信息,供我们在界面中使用了,这样也符合我的Winform开发框架的实体类绑定规则,提高我们数据的强类型约束。
如资源对象的实体类代码生成如下所示。
/// <summary>/// 日程资源/// </summary>[DataContract]public class AppResourceInfo : BaseEntity{/// <summary>/// 默认构造函数(需要初始化属性的在此处理)/// </summary>public AppResourceInfo(){this.ID = 0;this.ResourceId = 0;this.Color = 0;this.Image = new byte[] { };}#region Property Members[DataMember]public virtual int ID { get; set; }/// <summary>/// 资源ID/// </summary>[DataMember]public virtual int ResourceId { get; set; }/// <summary>/// 资源名称/// </summary>[DataMember]public virtual string ResourceName { get; set; }/// <summary>/// 颜色/// </summary>[DataMember]public virtual int Color { get; set; }/// <summary>/// 图形/// </summary>[DataMember]public virtual byte[] Image { get; set; }/// <summary>/// 自定义/// </summary>[DataMember]public virtual string CustomField1 { get; set; }#endregion}
有了这些对象,我们还需要做的就是绑定控件和保存控件数据到数据库里面的处理。
但是这里还需要注意一个问题就是,这个日程控件数据是通过字段映射的方式进行数据绑定的,也就是它本身也提供了几个常规字段的信息,因此我们需要把它们的属性和数据库的字段(这里是实体类)的信息进行匹配。
如我们可以通过绑定如下,事项Appointments和Resources的Mappings处理。
/// <summary>/// 设置日程控件的字段映射/// </summary>/// <param name="control">日程控件</param>private void SetMappings(SchedulerControl control){AppointmentMappingInfo appoint = control.Storage.Appointments.Mappings;appoint.AllDay = "AllDay";appoint.Description = "Description";appoint.End = "EndDate";appoint.Label = "AppLabel";appoint.Location = "Location";appoint.RecurrenceInfo = "RecurrenceInfo";appoint.ReminderInfo = "ReminderInfo";appoint.ResourceId = "ResourceId";appoint.Start = "StartDate";appoint.Status = "Status";appoint.Subject = "Subject";appoint.Type = "EventType";ResourceMappingInfo res = control.Storage.Resources.Mappings;res.Caption = "ResourceName";res.Color = "Color";res.Id = "ResourceId";res.Image = "Image";}
确定控件属性和实体类之间关系后,我们就需要从数据库里面加载信息了。我们在窗体的代码里面增加两个资源对象的集合列表,如下代码所示。
//日程资源集合和事件列表private List<AppResourceInfo> ResourceList = new List<AppResourceInfo>();private List<UserAppointmentInfo> EventList = new List<UserAppointmentInfo>();
然后就是把数据从数据库里面,通过开发框架底层的工厂类进行数据的提取,如下代码所示。
private void btnLoadData_Click(object sender, EventArgs e){//从数据库加载日程信息List<AppResourceInfo> resouceList = BLLFactory<AppResource>.Instance.GetAll();this.schedulerStorage1.Resources.DataSource = resouceList;List<UserAppointmentInfo> eventList = BLLFactory<UserAppointment>.Instance.GetAll();this.schedulerStorage1.Appointments.DataSource = eventList;if (resouceList.Count > 0){MessageDxUtil.ShowTips("数据加载成功");}else{MessageDxUtil.ShowTips("数据库不存在记录");}}
而保存数据,我们把对象里面的集合存储到数据库里面即可。
private void btnSave_Click(object sender, EventArgs e){int count = BLLFactory<AppResource>.Instance.GetRecordCount();if (count == 0){try{foreach (AppResourceInfo info in ResourceList){BLLFactory<AppResource>.Instance.Insert(info);}foreach (UserAppointmentInfo info in EventList){BLLFactory<UserAppointment>.Instance.Insert(info);}MessageDxUtil.ShowTips("数据保存成功");}catch (Exception ex){LogTextHelper.Error(ex);MessageDxUtil.ShowError(ex.Message);}}else{MessageDxUtil.ShowTips("数据库已存在数据");}}
这样,通过代码工具Database2Sharp生成的代码,直接具有数据存储和获取的功能,例子就很容易明白和处理了,在实际的项目中,我们可能还需要存储用户的额外信息,如公司、部门、自定义信息等等,当然也可以通过这样的模式进行快速的开发,从而实现高效、统一、稳定的系统开发过程。
但是,言归正传,我们前面介绍的字段,都是控件里面有的内容,如果是控件里面没有,我们需要增加的自定义属性,那么我们应该如何处理呢,还有默认的日程界面可以修改吗,等等这些也是我们经常会碰到的问题。
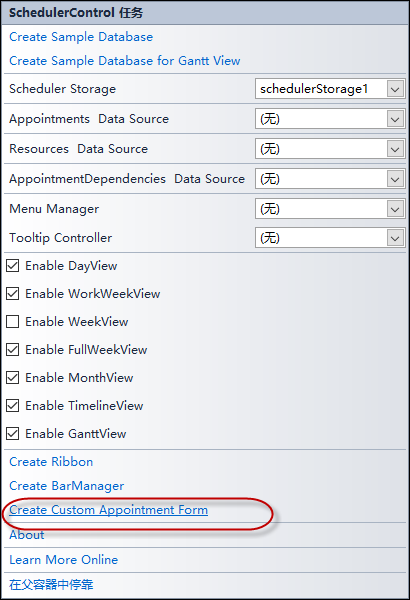
首先我们在日程控件界面上,通过连接按钮的方式,创建一个自定义的日程窗体,如下所示:
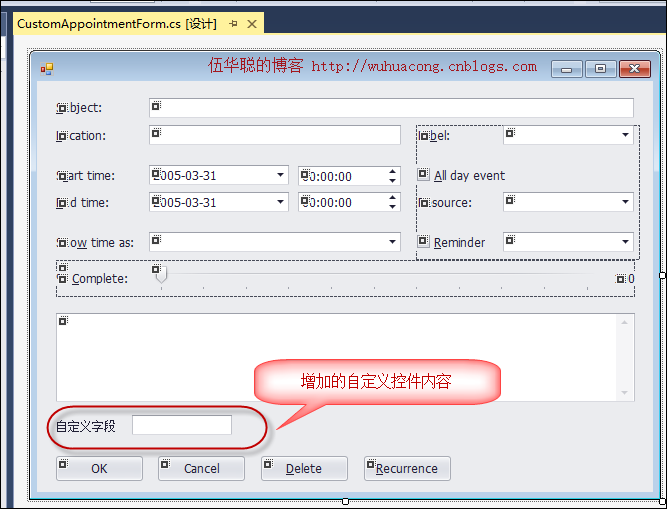
默认的后台代码里面,具有了LoadFormData和SaveFormData两个重载的方法,这里就是留给我们对自定义属性进行处理的方法体了。
我们在其中增加部分自定义属性字段的映射处理即可,如下代码所示。
/// <summary>/// Add your code to obtain a custom field value and fill the editor with data./// </summary>public override void LoadFormData(DevExpress.XtraScheduler.Appointment appointment){//加载自定义属性txtCustom.Text = (appointment.CustomFields["CustomField1"] == null) "" : appointment.CustomFields["CustomField1"].ToString();base.LoadFormData(appointment);}/// <summary>/// Add your code to retrieve a value from the editor and set the custom appointment field./// </summary>public override bool SaveFormData(DevExpress.XtraScheduler.Appointment appointment){//保存自定义属性appointment.CustomFields["CustomField1"] = txtCustom.Text;return base.SaveFormData(appointment);}
然后我们记得在主体窗体的映射里面,为他们增加对应的字段映射即可,映射代码如下所示。
AppointmentCustomFieldMappingCollection appointCust = control.Storage.Appointments.CustomFieldMappings;appointCust.Add(new AppointmentCustomFieldMapping("CustomField1","CustomField1"));
这样就构成了一个完整的映射信息。
/// <summary>/// 设置日程控件的字段映射/// </summary>/// <param name="control">日程控件</param>private void SetMappings(SchedulerControl control){AppointmentMappingInfo appoint = control.Storage.Appointments.Mappings;appoint.AllDay = "AllDay";appoint.Description = "Description";appoint.End = "EndDate";appoint.Label = "AppLabel";appoint.Location = "Location";appoint.RecurrenceInfo = "RecurrenceInfo";appoint.ReminderInfo = "ReminderInfo";appoint.ResourceId = "ResourceId";appoint.Start = "StartDate";appoint.Status = "Status";appoint.Subject = "Subject";appoint.Type = "EventType";AppointmentCustomFieldMappingCollection appointCust = control.Storage.Appointments.CustomFieldMappings;appointCust.Add(new AppointmentCustomFieldMapping("CustomField1","CustomField1"));ResourceMappingInfo res = control.Storage.Resources.Mappings;res.Caption = "ResourceName";res.Color = "Color";res.Id = "ResourceId";res.Image = "Image";}
以上就是我在整合日程控件XtraScheduler的经验总结,其中已经考虑了数据存储和显示,以及快速开发的几个方面,当然我们可以根据这些案例,做出更好的日程应用来了。
DevExpress技术交流群6:600715373 欢迎一起进群讨论

标签:
声明:本站部分文章及图片源自用户投稿,如本站任何资料有侵权请您尽早请联系jinwei@zod.com.cn进行处理,非常感谢!