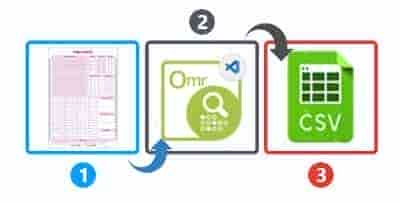

(一) C# 光学标记识别 (OMR) 软件的特点
我们的光学标记识别 (OMR) 软件将具有以下功能:
- 交互式调整识别参数并实时观察其效果。我们可以调整以下内容:
- 识别阈值
- 飞涨
- 显示/隐藏气泡
- 选择并加载以下格式的扫描图像:
- PNG
- JPG/JPEG
- 动图
- TIF/TIFF
- 识别图像上的光学标记。
- 以 CSV 格式导出结果并将其保存到本地磁盘。
(二) C# 光学标记识别 .NET API 和 UI 控制
Aspose.OMR for .NET API 允许设计、创建和识别答题卡、测试、MCQ 试卷、测验、反馈表、调查和选票。此外,它还提供了一个图形用户界面控件,可以添加到 .NET UI 应用程序中。我们将在 .NET UI 应用程序中集成 Aspose.OMR for .NET UI 控件,以开发 OMR 扫描仪/阅读器应用程序。请下载API 的 DLL 或使用NuGet安装它。
PM> Install-Package Aspose.OMR
(三) 开发 OMR 软件的步骤
我们可以按照以下步骤开发基于 GUI 的 OMR 扫描仪/阅读器应用程序:
- 首先,创建一个新项目并选择WPF App (.NET Framework)项目模板。
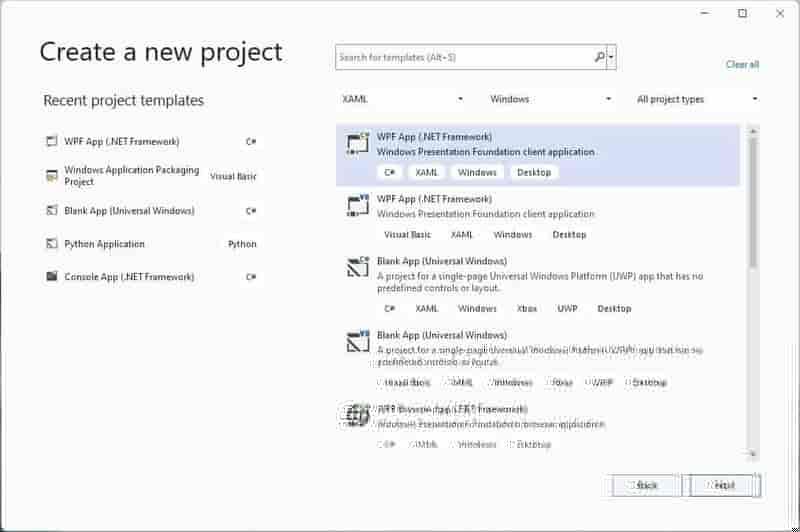
- 接下来,在Configure your new project对话框中,输入Project name,选择Location并设置其他参数。

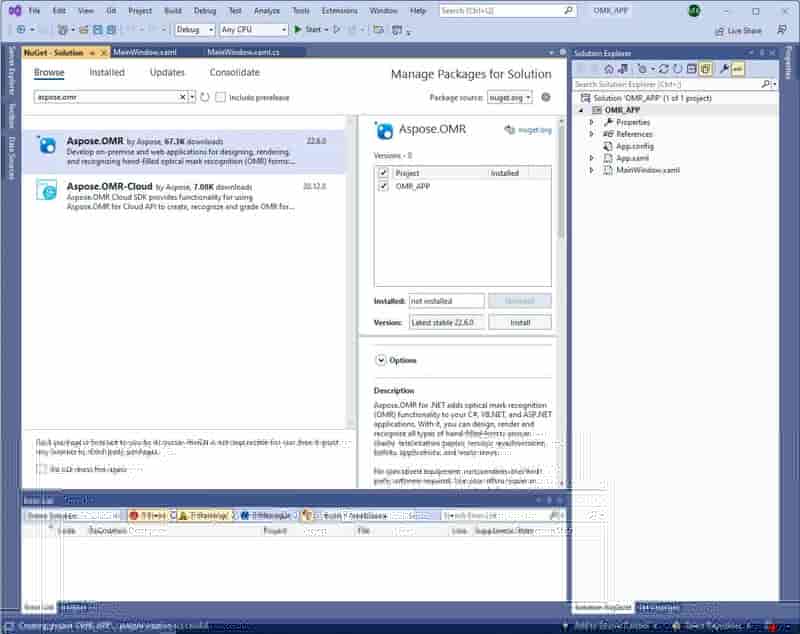
- 然后,打开NuGet 包管理器并安装Aspose.OMR for .NET包。
- 接下来,将新文件DialogHelper.cs添加到项目中。
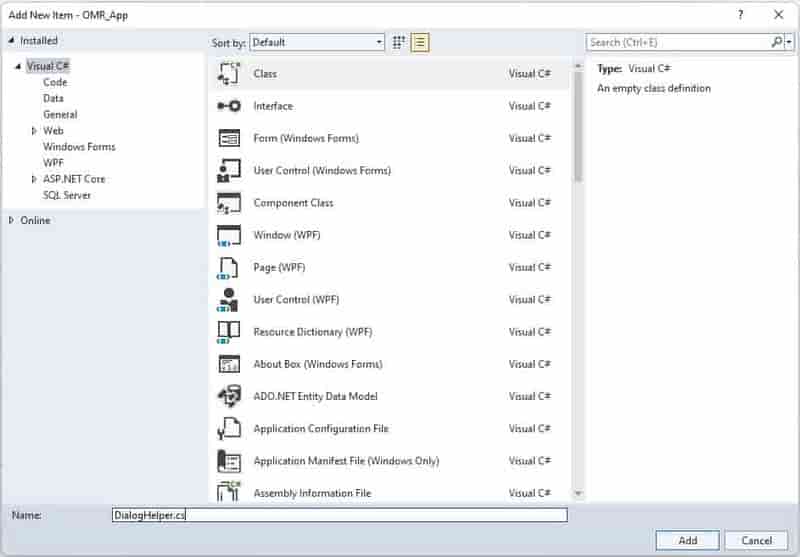
- 将以下代码添加到新创建的DialogHelper.cs中。
internal class DialogHelper{/// <summary>/// The filter string for the dialog that opens template images./// </summary>private static readonly string ImageFilesFilterPrompt = "Image files |*.jpg; *.jpeg; *.png; *.gif; *.tif; *.tiff;";/// <summary>/// The filter string for the dialog that saves recognition results/// </summary>private static readonly string DataExportFilesFilterPrompt = "Comma-Separated Values (*.csv)" + " | *.csv";/// <summary>/// Shows Open Image file dialog./// </summary>/// <returns>Path to selected file, or <c>null</c> if no file was selected.</returns>public static string ShowOpenImageDialog(string suggestedDir = null){OpenFileDialog dialog = new OpenFileDialog();return ShowDialog(dialog, ImageFilesFilterPrompt, suggestedDir);}/// <summary>/// Shows Save Recognition Results file dialog./// </summary>/// <returns>Path to selected file, or <c>null</c> if no file was selected.</returns>public static string ShowSaveDataDialog(string suggestedName){SaveFileDialog dialog = new SaveFileDialog();return ShowDialog(dialog, DataExportFilesFilterPrompt, suggestedName);}/// <summary>/// Displays given dialog and returns its result as a <c>string</c>./// </summary>/// <param name="dialog">The dialog to show.</param>/// <param name="filter">File type filter string.</param>/// <param name="suggestedDir">Suggested dialog initial directory</param>/// <param name="suggestedName">Suggested file name</param>/// <returns>Path to selected file, or <c>null</c> if no file was selected.</returns>private static string ShowDialog(FileDialog dialog, string filter, string suggestedDir = null, string suggestedName = null){string fileName = null;dialog.Filter = filter;dialog.RestoreDirectory = true;if (suggestedName != null){dialog.FileName = suggestedName;}if (suggestedDir != null){dialog.InitialDirectory = suggestedDir;}boolresult = dialog.ShowDialog();if (result == true){fileName = dialog.FileName;}return fileName;}}
- 接下来,使用以下 XAML 内容更新MainWindow.xaml文件。
<Window x_Class="OMR_APP.MainWindow"xmlns:x="http://schemas.microsoft.com/winfx/2006/xaml"xmlns:d="http://schemas.microsoft.com/expression/blend/2008"xmlns:mc="http://schemas.openxmlformats.org/markup-compatibility/2006"xmlns:local="clr-namespace:OMR_APP"mc:Ignorable="d"Title="Aspose OMR Demo" Height="880" Width="1100"><Grid Background="WhiteSmoke"><Grid.RowDefinitions><RowDefinition Height="40"></RowDefinition><RowDefinition Height="*"></RowDefinition></Grid.RowDefinitions><ToolBar Grid.Row="0" Background="LightGray"><TextBox Name="txtTemplatePath" Margin="5" Width="400" Height="30" Background="White"HorizontalContentAlignment="Center" VerticalContentAlignment="Center"></TextBox><Button Margin="5" Width="100" Height="30" Background="White"Content="Get control" HorizontalContentAlignment="Center" VerticalContentAlignment="Center"Click="GetButtonClicked"/><Separator/><Button Margin="5" Width="100" Height="30" Background="White"Content="Select Image" Click="SelectImageClicked"/><Button Margin="5" Width="100" Height="30" Background="White"Content="Recognize Image" Click="RecognizeImageClicked"/><Button Margin="5" Width="100" Height="30" Background="White"Content="Export Results" Click="ExportResultsClicked"/></ToolBar><ContentControl Grid.Row="1" x_Name="CustomContentControl"HorizontalAlignment="Center" VerticalAlignment="Center"/></Grid></Window>view rawOMR-Software-CSharp_MainWindow.xaml hosted with by GitHub之后,替换MainWindow.xaml.cs文件中的以下内容。/// <summary>/// Template for testing/// </summary>private static readonly string TemplateFilePath = @"C:FilesOMRSheet.omr";/// <summary>/// Path to the license Aspose.OMR.NET.lic file/// </summary>private static readonly string LicensePath = @"";private CorrectionControl control;public MainWindow(){InitializeComponent();// Set and show template file pathtxtTemplatePath.Text = TemplateFilePath;// Set license, provide License file Path and uncomment to test full results//License lic = new License();//lic.SetLicense(LicensePath);}public string UserImagePath { get; set; }public string DataFolderPath { get; set; }/// <summary>/// Loads and displays CorrectionControl/// </summary>private void GetButtonClicked(object sender, RoutedEventArgs e){string path = txtTemplatePath.Text;try{OmrEngine engine = new OmrEngine();TemplateProcessor processor = engine.GetTemplateProcessor(path);control = engine.GetCorrectionControl(processor);CustomContentControl.Content = control;control.Initialize();}catch (Exception ex){MessageBox.Show(ex.Message,"Exception");}}/// <summary>/// Select and display image/// </summary>private void SelectImageClicked(object sender, RoutedEventArgs e){if (control == null){return;}string imagePath = DialogHelper.ShowOpenImageDialog(this.DataFolderPath);if (string.IsNullOrEmpty(imagePath)){return;}this.UserImagePath = imagePath;control.LoadAndDisplayImage(imagePath);}/// <summary>/// Recognize loaded image/// </summary>private void RecognizeImageClicked(object sender, RoutedEventArgs e){if (control == null){return;}control.RecognizeImage();}/// <summary>/// Export results to CSV/// </summary>private void ExportResultsClicked(object sender, RoutedEventArgs e){if (control == null){return;}string imageName = Path.GetFileNameWithoutExtension(this.UserImagePath);string path = DialogHelper.ShowSaveDataDialog(imageName);if (string.IsNullOrEmpty(path)){return;}control.ExportResults(path);MessageBox.Show("The exported resultant CSV file can be found here : " + path, "Operation Successful");}
- 最后,运行应用程序。
(四) C# 光学标记识别 (OMR) 软件演示
以下是我们刚刚创建的 OMR Scanner/Reader 应用程序的演示。

(五) 结论
欢迎下载|体验更多Aspose产品
获取更多信息请咨询在线客服 或 加入Aspose技术交流群()
标签:
声明:本站部分文章及图片源自用户投稿,如本站任何资料有侵权请您尽早请联系jinwei@zod.com.cn进行处理,非常感谢!