Dynamic Web TWAIN正式版
将Dynamsoft Barcode SDK的C / C ++ API与JavaScript绑定
让我们开始使用Node.js条码C / C ++插件。
为了支持OpenCV Mat,我创建了一个新的API encodingBufferAsync()。C / C ++代码如下:
void DecodeBufferAsync(const FunctionCallbackInfo& args) { if (!createDBR()) {return;} Isolate* isolate = Isolate::GetCurrent(); Local context = isolate->GetCurrentContext(); // get arguments unsigned char* buffer = (unsigned char*) node::Buffer::Data(args[0]); // file stream int width = args[1]->Int32Value(context).ToChecked(); // image width int height = args[2]->Int32Value(context).ToChecked(); // image height int stride = args[3]->Int32Value(context).ToChecked(); // stride int iFormat = args[4]->Int32Value(context).ToChecked(); // barcode types Local cb = Local ::Cast(args[5]); // javascript callback function String::Utf8Value templateName(isolate, args[6]); // template name char *pTemplateName = *templateName; // initialize BarcodeWorker BarcodeWorker *worker = new BarcodeWorker; worker->request.data = worker; worker->callback.Reset(isolate, cb); worker->iFormat = iFormat; worker->pResults = NULL; worker->buffer = buffer; worker->width = width; worker->height = height; worker->bufferType = RGB_BUFFER; worker->stride = stride; if (hasTemplate(pTemplateName)) { // Load the template. char szErrorMsg[256]; DBR_InitRuntimeSettingsWithString(hBarcode, pTemplateName, CM_OVERWRITE, szErrorMsg, 256); worker->useTemplate = true; } else { worker->useTemplate = false; } uv_queue_work(uv_default_loop(), &worker->request, (uv_work_cb)DetectionWorking, (uv_after_work_cb)DetectionDone);}
第一个参数是Node.js缓冲区指针。您可以调用getData()从Mat获取字节数组:
const vCap = new cv.VideoCapture(0);var img = vCap.read();dbr.decodeBufferAsync(img.getData(), img.cols, img.rows, img.step, barcodeTypes, function (err, msg) { results = msg }, "");
注意:macOS的构建配置与binding.gyp文件中的Linux配置略有不同:
'copies': [ { 'destination': '/usr/local/lib/', 'files': [ './platforms/macos/libDynamsoftBarcodeReader.dylib' ] } ]
与在Linux上不同,一旦构建完成,动态库文件将被复制到/ usr / local / lib /目录。原因是RPATH无法在macOS上运行。我们可以使用“ otool -L dbr.node ”来检查依赖库,然后获取路径/usr/local/lib/libDynamsoftBarcodeReader.dylib。
如果要将库文件和dbr.node保留在同一文件夹中,则可以手动更改库路径:
cd build/Releaseinstall_name_tool -change /usr/local/lib/libDynamsoftBarcodeReader.dylib @loader_path/libDynamsoftBarcodeReader.dylib dbr.node
我已经将该软件包发布到https://www.evget.com/product/1313。要安装该软件包,您需要安装C ++开发工具,然后运行:
npm install -g node-gypnpm install barcode4nodejs
在5分钟内为桌面和Web构建Node.js条形码阅读器
桌面
基本上,我们可以使用无限循环来捕获摄像头帧并将其显示在窗口中:
const cv = require('opencv4nodejs');const vCap = new cv.VideoCapture(0);const delay = 10;while (true) { let frame = vCap.read(); if (frame.empty) { vCap.reset(); frame = vCap.read(); } cv.imshow('OpenCV Node.js', frame); const key = cv.waitKey(delay); // Press ESC to quit if (key == 27) {break;}}
但是,如果我们在循环中调用异步条形码解码功能,则回调函数将永远不会返回。为了使其工作,我们可以使用setTimeout() 代替:
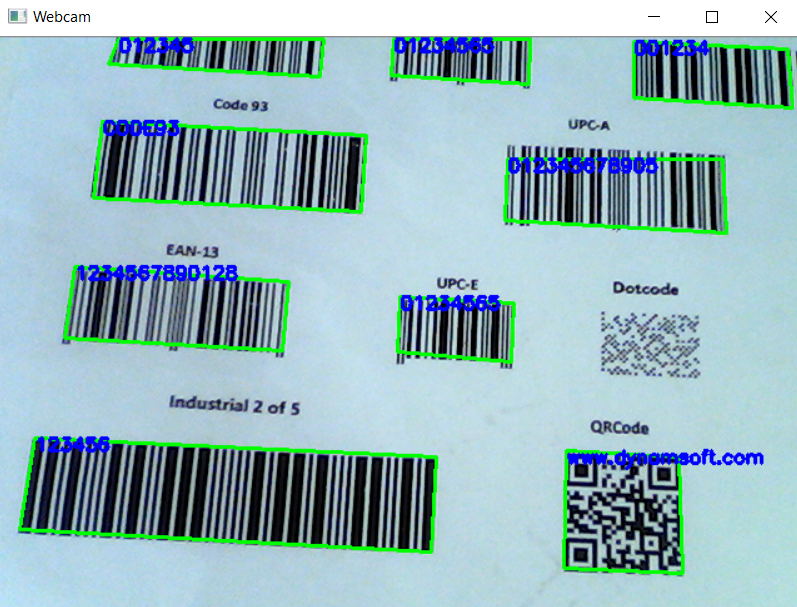
const dbr = require('barcode4nodejs');const cv = require('opencv4nodejs');dbr.initLicense("LICENSE-KEY")barcodeTypes = dbr.barcodeTypesconst vCap = new cv.VideoCapture(0);const drawParams = { color: new cv.Vec(0, 255, 0), thickness: 2 }const fontFace = cv.FONT_HERSHEY_SIMPLEX;const fontScale = 0.5;const textColor = new cv.Vec(255, 0, 0);const thickness = 2;results = null;function getframe() { let img = vCap.read(); dbr.decodeBufferAsync(img.getData(), img.cols, img.rows, img.step, barcodeTypes, function (err, msg) { results = msg }, "", 1); cv.imshow('Webcam', img); const key = cv.waitKey(10); // Press ESC to quit if (key != 27) { setTimeout(getframe, 30); }}getframe()
由于连续的 络摄像头图像相似,因此可以在不同的帧上绘制结果:
if (results != null) { for (index in results) { let result = results[index]; let upperLeft = new cv.Point(result.x1, result.y1) let bottomLeft = new cv.Point(result.x2, result.y2) let upperRight = new cv.Point(result.x3, result.y3) let bottomRight = new cv.Point(result.x4, result.y4) img.drawLine( upperLeft, bottomLeft, drawParams ) img.drawLine( bottomLeft, upperRight, drawParams ) img.drawLine( upperRight, bottomRight, drawParams ) img.drawLine( bottomRight, upperLeft, drawParams ) img.putText(result.value, new cv.Point(result.x1, result.y1 + 10), fontFace, fontScale, textColor, thickness); } }

页
将条形码检测代码复制到web.js文件中:
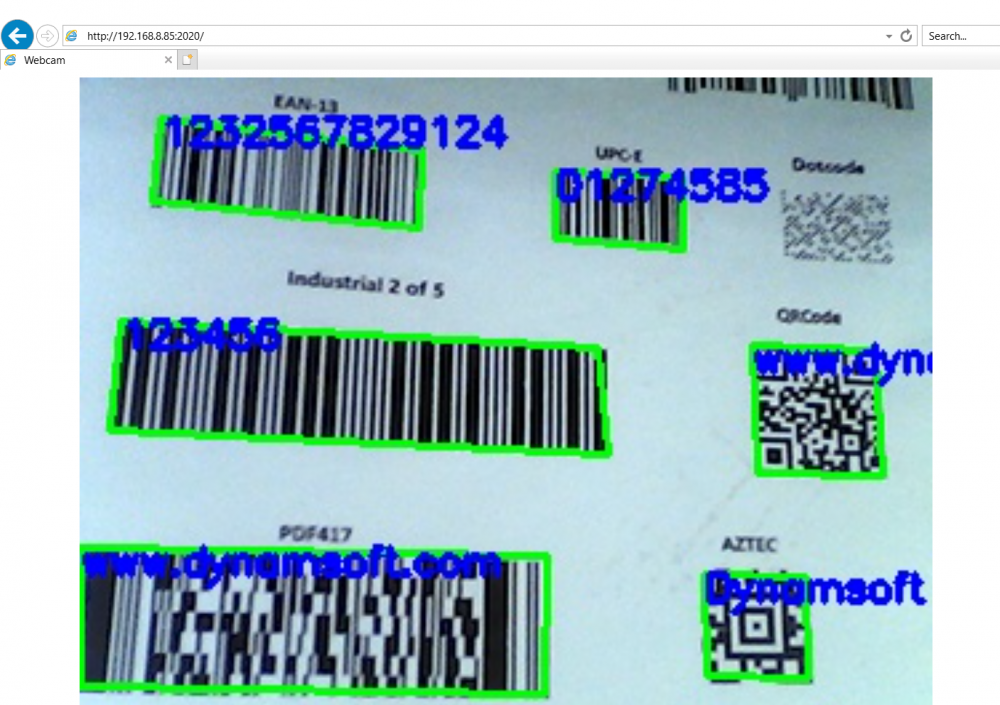
function capture() { var frame = wCap.read() if (frame.empty) { wCap.reset(); frame = wCap.read(); } dbr.decodeBufferAsync(frame.getData(), frame.cols, frame.rows, frame.step, barcodeTypes, function (err, msg) { // console.log(results) results = msg }, "", 1); if (results != null) { for (index in results) { let result = results[index]; let upperLeft = new cv.Point(result.x1, result.y1) let bottomLeft = new cv.Point(result.x2, result.y2) let upperRight = new cv.Point(result.x3, result.y3) let bottomRight = new cv.Point(result.x4, result.y4) frame.drawLine( upperLeft, bottomLeft, drawParams ) frame.drawLine( bottomLeft, upperRight, drawParams ) frame.drawLine( upperRight, bottomRight, drawParams ) frame.drawLine( bottomRight, upperLeft, drawParams ) frame.putText(result.value, new cv.Point(result.x1, result.y1 + 10), fontFace, fontScale, textColor, thickness); } } img = cv.imencode('.jpg', frame); setTimeout(capture, 30);}capture();
现在我们可以运行服务器端条形码检测。它与任何Web浏览器完全兼容。这是Microsoft Internet Explorer的屏幕截图。