在上文中(
在嵌入式设备上运行
我们已经演示了如何交叉编译在Visual Studio中创建的“hello world” Qt Quick应用程序。现在,我们将看到如何在树莓派上运行该应用程序。由于我们将以全屏模式运行,因此必须首先在应用程序窗口中添加一些内容。
main.qmlWindow {visible: truetitle: qsTr("Hello World")Text {id: clockfont.pointSize: 72Timer {interval: 1000; running: true; repeat: trueonTriggered: clock.text = (new Date).toLocaleTimeString(Qt.locale("de_DE"), "hh:mm:ss");}}}
Qt Quick “Hello World”
和以前一样,选择Linux项目配置,然后按F7键开始交叉编译。
Visual Studio构建输出
1>------ Build started: Project: QuickMirror, Configuration: Debug_RPi x64 ------1>rcc qml.qrc1>Invoking 'mkdir -p $(dirname qml.qrc); mkdir -p $(dirname /mnt/c/Users/user/Source/Repos/QuickMirror/main.qml); mkdir -p $(dirname /mnt/c/Users/user/Source/Repos/QuickMirror/obj/x64/Debug_RPi/rcc/qrc_qml.cpp); (/home/user/raspi/qt5/bin/rcc /mnt/c/Users/user/Source/Repos/QuickMirror/qml.qrc --name qml -o /mnt/c/Users/user/Source/Repos/QuickMirror/obj/x64/Debug_RPi/rcc/qrc_qml.cpp)', working directory: '/mnt/c/Users/user/Source/Repos/QuickMirror'1>Starting remote build1>Compiling sources:1>qrc_qml.cpp1>Linking objects1>QuickMirror.vcxproj -> C:UsersuserSourceReposQuickMirrorbinx64Debug_RPiQuickMirror.out========== Build: 1 succeeded, 0 failed, 0 up-to-date, 0 skipped ==========
VS中交叉编译Qt项目
现在我们把应用程序的二进制文件上传到树莓派。构建输出窗口显示了生成的二进制文件的位置(倒数第二行)。
Windows命令提示
C:Usersuser> scp C:UsersuserSourceReposQuickMirrorbinx64Debug_RPiQuickMirror.out pi@192.168.1.98:/home/pi/pi@192.168.1.98's password:QuickMirror.out 100% 465KB 1.6MB/s 00:00C:Usersuser>
将应用程序二进制文件上传到目标设备
要在为了在每次构建结束时自动复制应用程序文件,可以在“ WSL Post-Build Event”属性页中设置如下命令(注意: 这将以明文形式保存设备密码)。
Project Properties > WSL Post-Build Event > Command Line
curl –insecure –user pi:<password> -T /mnt/$(TargetPath.Replace(”,’/’).Replace(‘:’,”).ToLower()) scp://<device-addr>/home/pi/$(TargetFileName)
在每次构建结束时将二进制文件复制到设备端
在启动Qt Quick应用程序之前,我们需要设置一些必需的环境变量:
- LD_LIBRARY_PATH: Qt二进制文件安装的路径。
- QT_QPA_PLATFORM:QPA平台插件。
- QT_QPA_PLATFORM_PLUGIN_PATH:QPA平台插件安装的路径。
- QT_QPA_EGLFS_PHYSICAL_WIDTH、QT_QPA_EGLFS_PHYSICAL_HEIGHT:物理屏幕的宽度和高度,以毫米为单位。
- QML2_IMPORT_PATH:安装的QML模块的路径。
树莓派命令外壳
pi@raspberry-pi:~$ export LD_LIBRARY_PATH="/usr/local/qt5pi/lib"pi@raspberry-pi:~$ export QT_QPA_PLATFORM="eglfs"pi@raspberry-pi:~$ export QT_QPA_PLATFORM_PLUGIN_PATH="/usr/local/qt5pi/plugins/platforms"pi@raspberry-pi:~$ export QT_QPA_EGLFS_PHYSICAL_WIDTH="326"pi@raspberry-pi:~$ export QT_QPA_EGLFS_PHYSICAL_HEIGHT="520"pi@raspberry-pi:~$ export QML2_IMPORT_PATH="/usr/local/qt5pi/qml"pi@raspberry-pi:~$ ./QuickMirror.out
树莓派显示器


在树莓派上运行“ Hello World”应用程序
应用程序开发过程
应用程序的要求包括显示以下信息:
- 当前时间
- 当前日期
- 重要公共纪念日
- 天气预
- 下一班公共交通工具
- 新闻
我们将把每个功能项封装为独立的QML类型。为此,我们必须首先将QML模块定义(qmldir)文件添加到项目中:
- 选择”Project > Add New Item.. > Qt > QML Module Definition”。
- 在位置字段中,设置包含QML文件的文件夹路径。
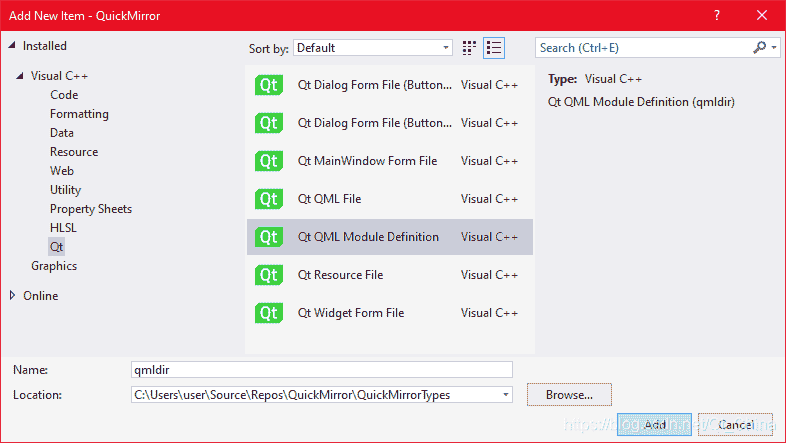
向项目添加新的QML模块定义
按下“Add”后,qmldir 文件将在项目树中变为可用。我们将使用此文件来映射每种QML类型到其对应的源文件。

将QML类型映射到源文件
将新的QML源文件添加到项目中:
- 选择“Project > Add New Item… > Qt > QML File””。
- 将位置设置为qmldir同级目录。
- 设置QML文件名。
- 按“Add”。
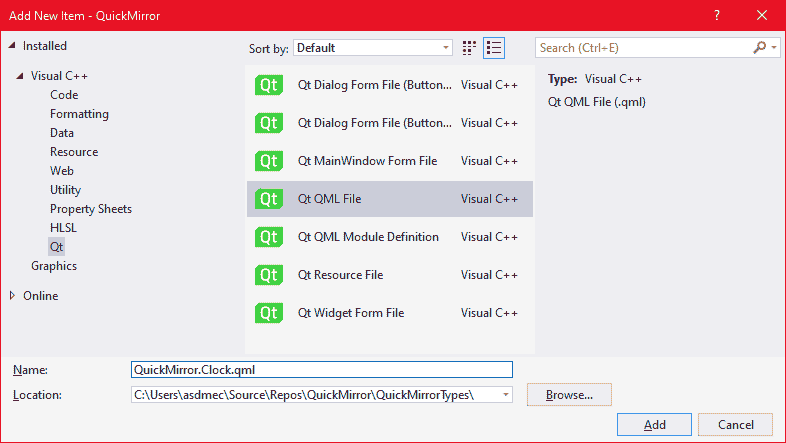
向项目添加新的QML文件
我们将首先添加用于显示当前时间、当前日期和重要公共纪念日的QML类型。该Clock类型将显示当前时间,每秒刷新一次。
Text {font.family: FontFamily_Clockfont.styleName: FontStyle_Clockfont.pointSize: 144color: "white"renderType: Text.NativeRenderingantialiasing: falsefunction refresh() {text = (new Date).toLocaleTimeString(Qt.locale("de_DE"), "hh:mm");}Component.onCompleted : refresh();Timer {interval: 1000; running: true; repeat: true onTriggered: parent.refresh();}}
Clock QML类型的定义
该Calendar类型将显示当前日期,并在不同城市名之间循环。
Text {renderType: Text.NativeRenderingid: calendarcolor: "white"font.family: FontFamily_Boldfont.styleName: FontStyle_Boldfont.pointSize: 72property var locales: ["en_US", "de_DE", "pt_PT"]property var localeIdx: 0function capitalize(s) {return s.replace(/(-)./g, function(c) { return c.toUpperCase(); });}function setNextLocale() {localeIdx = (localeIdx + 1) % locales.length;}function getCurrentText() {var date = new Date;var locale = Qt.locale(locales[localeIdx]);var calendarText = capitalize(date.toLocaleDateString(locale, "dddd, dd"));var monthShort = date.toLocaleDateString(locale, "MMM");var monthLong = date.toLocaleDateString(locale, "MMMM");if (monthLong.length <= 5) {calendarText += capitalize(monthLong);} else {calendarText += capitalize(monthShort);if (!monthShort.endsWith("."))calendarText += ".";}calendarText += date.toLocaleDateString(locale, " yyyy");return calendarText;}Component.onCompleted: {text = getCurrentText();}Timer {interval: 15000; running: true; repeat: trueonTriggered: {setNextLocale();text = getCurrentText();}}Behavior on text {SequentialAnimation {NumberAnimation { target: calendar; property: "opacity"; to: 0.0; duration: 1000 }PropertyAction { target: calendar; property: "text" }NumberAnimation { target: calendar; property: "opacity"; to: 1.0; duration: 500 }}}}
Calendar QML类型的定义
除了日期/时间,我们的应用程序还将依靠Web API来检索信息。我们将在一个单独的进程中运行curl以连接到Web API。进程创建由名为Process的C ++类处理。然后,QML类型ApiCall将通过一个Process对象传送必要的参数运行curl并收集其输出。
Item {property var url: ""property var path: []property var query: []signal response(var response)signal error(var error)Process {id: curlproperty var path: Q_OS_WIN "C:WindowsSystem32curl.exe" : "/usr/bin/curl"property var request: ""command: path + " -s "" + request + """"""}function sendRequest() {curl.request = url;if (path.length > 0)curl.request += ""/"" + path.join(""/"");if (query.length > 0)curl.request += "" + query.join(""&"");curl.start();}Connections {target: curlonExit /*(int exitCode


声明:本站部分文章及图片源自用户投稿,如本站任何资料有侵权请您尽早请联系jinwei@zod.com.cn进行处理,非常感谢!